Kubernetes Lab: K8s Clustering with Vagrant, Ansible and Virtual Box
September 5, 2023 • 19 mins read

Harness the capabilities of open-source projects to effectively deploy a Kubernetes (k8s) cluster across multiple virtual machines.
The goal of this lab is to enhance our understanding of Kubernetes and its practical implementation for production readiness. While we might have prior experience with lightweight Kubernetes distributions like Minikube, MicroK8s, or K3s, it's essential to note that not all of these are suitable for production scenarios; certain distributions are explicitly designed for low-resource machines.
Well, here we are going to have fun with k8s on real computers, although virtual but still real 😉.
In order to establish uniformity and replicable environments across the lab, I propose employing Vagrant to automate the creation of virtual machines on VirtualBox and Ansible to configure needed software and tools. With that said, please make sure to have a server with at least 8 GB of RAM, 4 cores and with the following:
- Ubuntu Linux 20.04.6 LTS
- Oracle VM VirtualBox
- Vagrant
- Ansible
- SSH
Lab Outcome
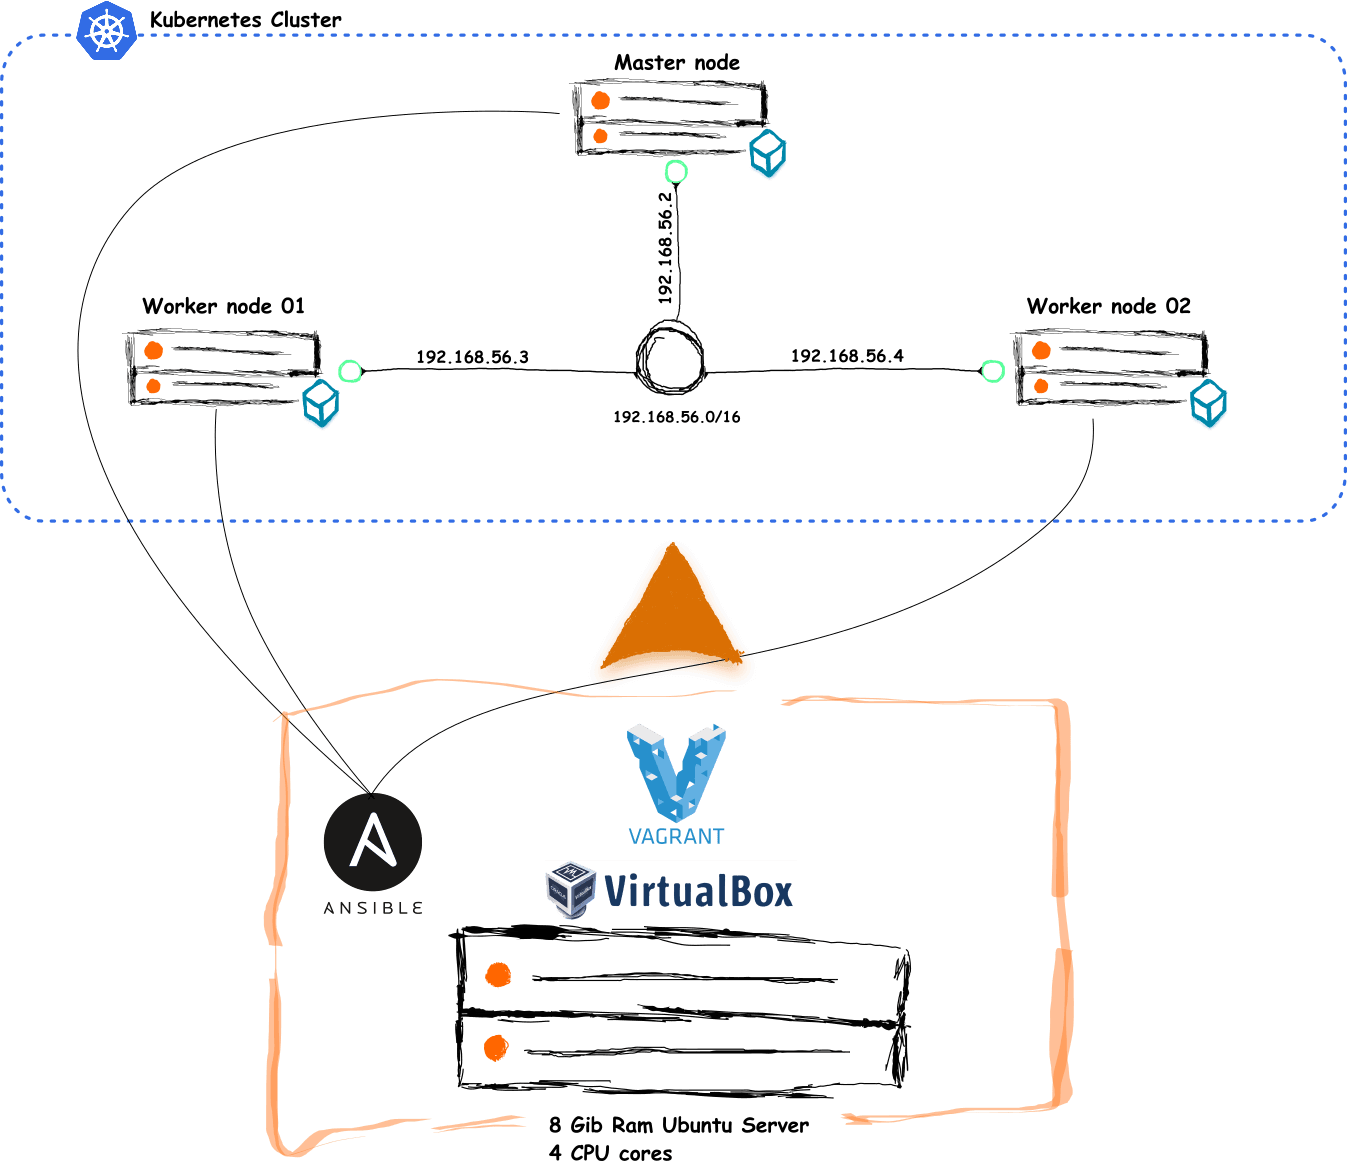
By the end of our lab, we are going to have a robust Kubernetes cluster able to run containerized applications. This cluster will consist of three virtual machines (VMs) running Ubuntu, wherein one will serve as the master node, and the remaining two will function as worker nodes.
Without any more delay, let's proceed with the provisioning the three VMs.
VMs Provisioning
Here, you can either work directly on your Ubuntu server or connect to it via SSH from a separate machine. I recommend the latter approach, as it aligns with industry best practices. However, for this to work, both machines must be on the same network.
Before provisioning any VM with Vagrant, let's first define the network infrastructure for our Kubernetes cluster in the next section.
Network Setup
In this section, we will allocate private IP addresses to the virtual machines, establish networking rules, enhance DNS resolution, facilitate hostname-based communication between our machines, and consequently establish a secure private network.
VirtualBox offers several network modes for virtual machines, allowing them to communicate with the host system, with other virtual machines, and with external networks. In our case, we'll use the VirtualBox host-only networking mode which is a private network with IPv4 range of 192.168.56.0/21. From this range, we'll allocate three addresses to assign to our virtual machines as follows:
- Master Node: 192.168.56.2
- Worker Node01: 192.168.56.3
- Worker Node02: 192.168.56.4
📌 Keep in mind that this part of the network setup will be execute when we start working with Vagrant.
Next in this section, let's write the shell script that each VM will run in order to map all existing IPv4 addresses to their hostnames and save it in the local DNS file at "etc/hosts". SSH into your Ubuntu server and execute these instructions:
- Create a working directory named k8s-lab by running the following command:
mkdir k8s-lab- Change into the
k8s-labdirectory and create another directory named network:
cd k8s-lab
mkdir network- Navigate to the
netwrokdirectory to create a file namedhosts.sh:
cd network
touch hosts.sh- In hosts.sh, add the script below and save it:
#!/bin/bash
set -ex
ADDRESS="$(ip -4 addr show $1 | grep -i inet | head -1 |awk '{print $2}' | cut -d/ -f1)"
NETWORK=$(echo $ADDRESS | awk 'BEGIN {FS="."} ; { printf("%s.%s.%s", $1, $2, $3) }')

# Update local dns about other hosts
cat >> /etc/hosts <<EOF
${NETWORK}.2 master-node
${NETWORK}.3 worker-node01
${NETWORK}.4 worker-node02
EOF
In the same directory create another new file named dns.sh and paste the following
contents:
#!/bin/bash
sed -i -e 's/#DNS=/DNS=8.8.8.8' /etc/systemd/resolved.conf
service systemd-resolved restart
📋 This will update the DNS resolver configuration for each virtual machine by modifying the "/etc/systemd/resolved.conf" file, setting the default DNS to be 8.8.8.8 which corresponds to the Google public DNS resolver. By doing so, all of our Ubuntu VMs will have access to a reliable and widely used DNS resolver.
Last in this section is to ensure a proper communication between nodes and pods within our Kubernetes cluster, to do so we need to take these two actions:
- Enbale Forwarding for IPv4, allowing a specific node to send network packets between different network interfaces on the host machine, our Ubuntu server.
- Letting iptables on each node see bridged traffic: by default, iptables can't spot bridged traffic which make it impossible to handle network traffic between pods (meaning between different network segments).
So to implement the above go ahead, create a new file named ipv4_forward.sh in
the network directory and put the script below:
#!/bin/bash
# Forwarding IPv4 and letting iptables see bridged traffic
set -ex
cat <<EOF | sudo tee /etc/modules-load.d/k8s.conf
overlay
br_netfilter
EOF

sudo modprobe overlay
sudo modprobe br_netfilter

# sysctl params required by setup, params persist across reboots
cat <<EOF | sudo tee /etc/sysctl.d/k8s.conf
net.bridge.bridge-nf-call-iptables  = 1
net.bridge.bridge-nf-call-ip6tables = 1
net.ipv4.ip_forward                 = 1
EOF

# Apply sysctl params without reboot
sudo sysctl --system
In the following section, we will be drafting two Ansible playbooks. These playbooks will outline a series of tasks, configurations, and procedures that Ansible will run on our VMs during their creation.
Ansible Playbooks
The first playbook will instruct Ansible to install Containerd on all three machines. Kubernetes runs containerized applications but does not handle container management tasks itself, so it relies on container runtimes like Containerd or Docker to create, start, stop and delete containers.
And the second playbook will tell Ansible to install kubeadm, kubelet and kubectl also on each VM. Here's a breakdown of the significance of each tool this playbook will install:
-
kubeadm🔧 : machines within a k8s cluster can be of two titles, they are either called master nodes or worker nodes, and kubeadm is the tool we will use to determine which our VMs should be bootstrapped as the master node and how others should join the cluster as worker nodes. -
kubelet🔧 : will handle all communication between the master and worker nodes, manage the deployment of pods to those nodes by instructing Containerd and monitor how pods are running. -
kubectl🔧 : this famous tool needs no explanation, I am sure that some of us used it before to create K8s objects such as Pods, Deployments or Services.
Now that you're familiar with the objectives of the upcoming two playbook files, if not already proceed by connecting to your Ubuntu server via SSH and follow the instructions outlined below:
- Navigate to the
k8s-labdirectory and create another directory named ansible:
cd k8s-lab
mkdir ansible- Get to the
ansiblefolder and create the first Ansible playbook file namedplaybook-1.yml:
cd ansible
touch playbook-1.yml- Open the file with a text editor of your choice, paste the code below into it then save it:
---
- name: Install Container Runtime (Containerd)
  hosts: all
  become: true

  tasks:
    - name: Install Packages
      apt:
        name:
          [
            "apt-transport-https",
            "ca-certificates",
            "curl",
            "gnupg",
            "software-properties-common",
          ]
        state: present
        update_cache: yes

    - name: Add Docker GPG key
      apt_key:
        url: https://download.docker.com/linux/ubuntu/gpg
        state: present

    - name: Add Docker APT repository
      apt_repository:
        repo: deb https://download.docker.com/linux/ubuntu bionic stable

    - name: Install Containerd
      apt:
        name: containerd.io
        state: present
        update_cache: yes

    - name: Ensure containerd.io is active
      service:
        name: containerd
        state: started
        enabled: yes

    - name: Truncate config.toml file
      command: sudo truncate -s 0 /etc/containerd/config.toml

    - name: Configuring the systemd cgroup driver
      blockinfile:
        path: /etc/containerd/config.toml
        block: |
          [plugins."io.containerd.grpc.v1.cri".containerd.runtimes.runc]
              [plugins."io.containerd.grpc.v1.cri".containerd.runtimes.runc.options]
                SystemdCgroup = true

    - name: Restarting Containerd
      service:
        name: containerd
        state: restarted
        enabled: yes
📋 Once our three VMs will be deployed on VirtualBox by Vagrant, Ansible will execute this playbook to perform these seven tasks:
- Update apt, the local package index across all three VMs and install packages allowing apt to use a repository over HTTPS
- Add Docker official GPG key
- Add Docker apt repository
- Install containerd
- Ensure that Containerd is active
- Make Containerd using the systemd cgroup driver to manage the cgroups for containers
- Restart Containerd
Next within the same ansible directory is to create the second ansible playbook named playbook-2.yml and insert the following snippet:
---
- name: Install Kubeadm, Kubelet and Kubectl
  hosts: all
  become: true

  tasks:
    - name: Install Packages
      apt:
        name: ["apt-transport-https", "ca-certificates", "curl"]
        state: present
        update_cache: yes

    - name: Add Kubernetes GPG key
      apt_key:
        url: https://packages.cloud.google.com/apt/doc/apt-key.gpg
        state: present

    - name: Add Kubernetes APT repository
      apt_repository:
        repo: deb https://apt.kubernetes.io/ kubernetes-xenial main

    - name: Install kubelet, kubeadm and kubectl, and pin their version
      apt:
        name: ["kubelet", "kubeadm", "kubectl"]
        state: present
        update_cache: yes

    - name: Put Packages Kubeadm Kubectl Kubelet on hold
      shell: >
        apt-mark hold kubeadm kubectl kubelet
📋 After successfully installing Containerd, Ansible will use this playbook to execute these five tasks on each VM:
- Update apt, the local package index across all three VMs and install packages allowing apt to use a repository over HTTPS
- Add Kubernetes GPG key
- Add Kubernetes apt repository
- Install kubelet, kubeadm and kubectl
- Put Packages Kubeadm, Kubectl and Kubelet on hold (preventing those packages from upgrades and therefore ensuring their compatibility)
Vagrant Configuration
provisioning our three virtual machines on VirtualBox using Vagrant. To begin, install VirtualBox on your Ubuntu server before moving ahead, Vagrant works seamlessly with many virtualization tools called providers (VMWare, Docker) but VirtualBox remains the default provider used when one creates a new Vagrant project.
After VirtualBox, install Vagrant
already installed by running the command vagrant -v. Once confirmed, go to the
working directory to proceed further.

Great, we have VirtualBox and Vagrant, now in the next two steps let’s stand up the three virtual machines we need for our lab.
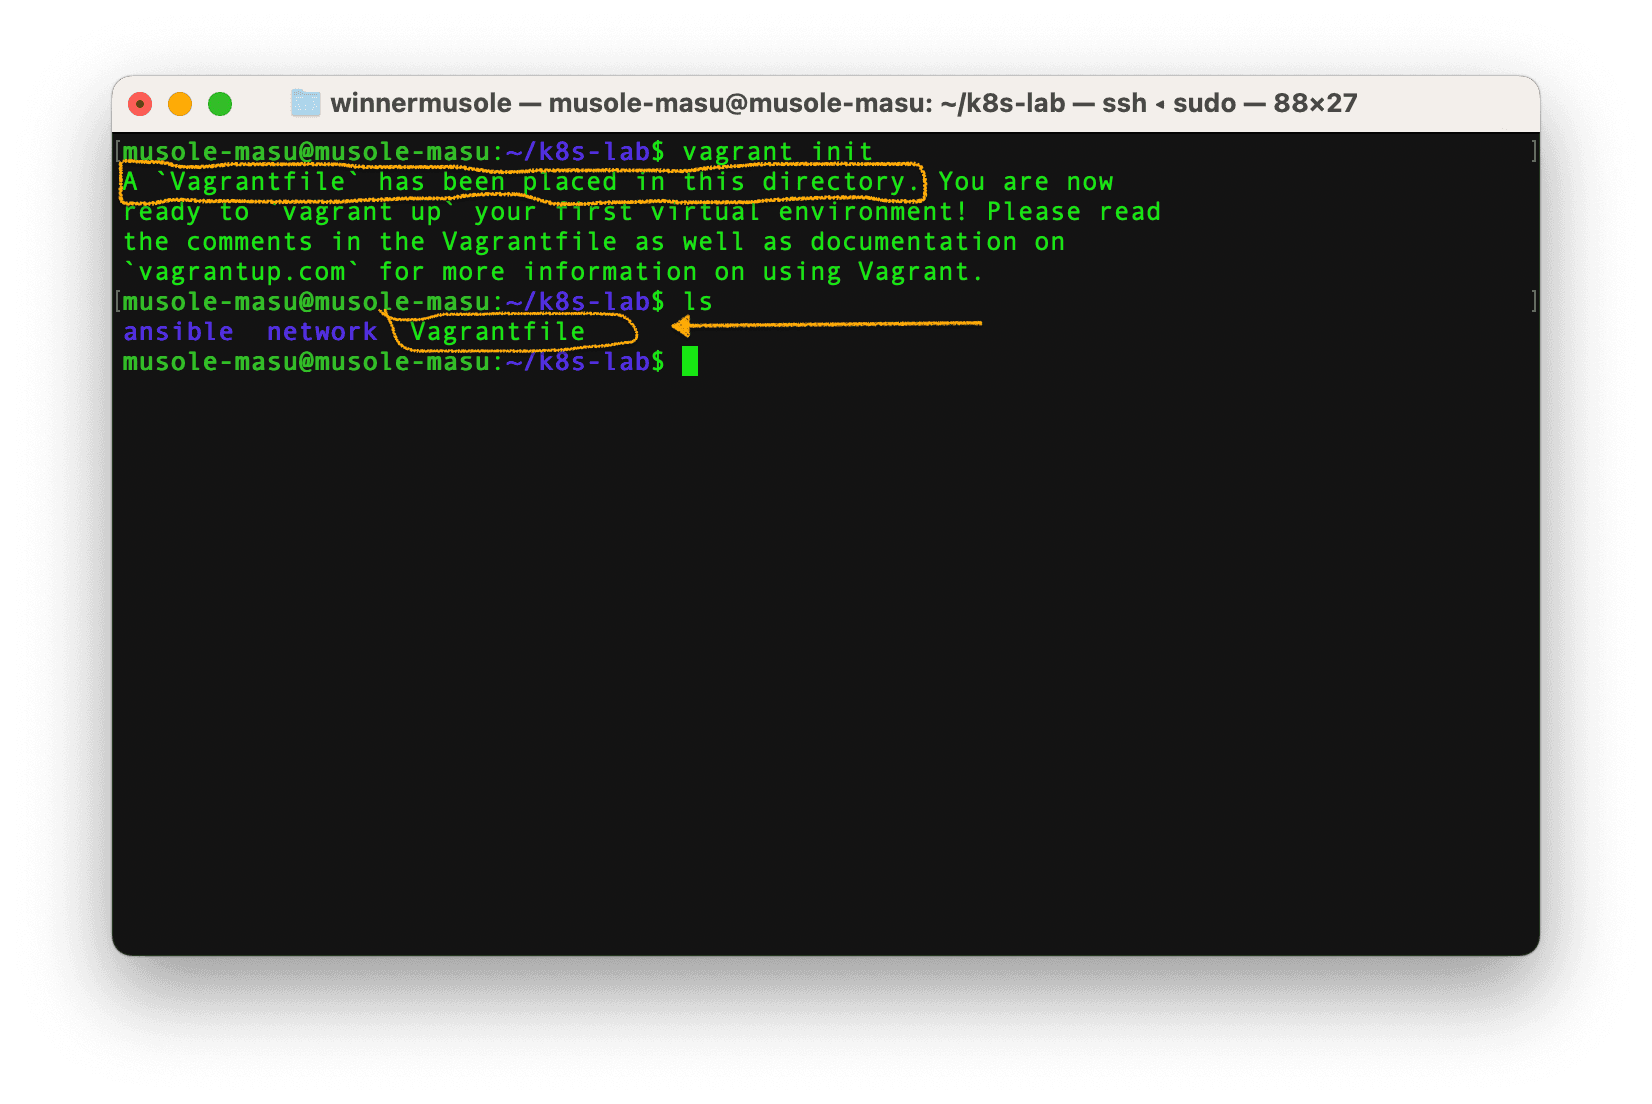
💡 Step 1
In the working directory, run vagrant init to create an initial
Vagrantfile which will contain our VMs configurations;
Next, with vim, vi or your favorite editor open the Vagrantfile, remove all existing configurations and put the configurations below:
# Every Vagrant development environment requires a box. You can search for
# boxes at https://vagrantcloud.com/search.
box = "ubuntu/bionic64"
ansible_inventory_path = "inventory/hosts"
ssh_key = "~/.ssh/id_rsa"

ansible_playbook = [
    { :name => "Containerd", :path => "ansible/playbook-1.yml" },
    { :name => "Kubernetes", :path => "ansible/playbook-2.yml" }
]

nodes   =   [
    { :hostname => "master-node", :ip => "192.168.56.2", :group => "master", :memory => 2048, :cpu => 2, :guest => 22, :host => "27101" },
    { :hostname => "worker-node01", :ip => "192.168.56.3", :group => "worker", :memory => 2048, :cpu => 1, :guest => 22, :host => "27102" },
    { :hostname => "worker-node02", :ip => "192.168.56.4", :group => "worker", :memory => 2048, :cpu => 1, :guest => 22, :host => "27103" }
]

def configure_dns(node)
    # Set up /etc/hosts
    node.vm.provision "setup-hosts", :type => "shell", :path => "network/hosts.sh" do |s|
      s.args = ["enp0s8", node.vm.hostname]
    end
    # Set up DNS resolution
    node.vm.provision "setup-dns", type: "shell", :path => "network/dns.sh"
end

Vagrant.configure("2") do |config|

    if File.dirname(ansible_inventory_path) != "."
        Dir.mkdir(File.dirname(ansible_inventory_path)) unless Dir.exist?(File.dirname(ansible_inventory_path))
    end

    File.open(ansible_inventory_path, 'w') do |f|
        f.write "\n"
        f.write "[nodes]\n"
        nodes.each do |node|
            f.write "#{node[:hostname]} ansible_host=#{node[:ip]} \n"
        end

        nodes.each do |node|
            if node[:group] == "master"
                f.write "\n"
                f.write "[master]\n"
                f.write "#{node[:hostname]} ansible_host=#{node[:ip]} \n"
            else
                f.write "[worker]\n"
                f.write "#{node[:hostname]} ansible_host=#{node[:ip]} \n"
            end
        end
    end

    # Virtual Machine Image
    config.vm.box = box

    # Loop through all nodes to provision vms
    nodes.each_with_index do |node, index|

        config.vm.define node[:hostname] do |conf|
            conf.vm.provider "virtualbox" do |vb|
                vb.name = node[:hostname]
                vb.memory = node[:memory]
                vb.cpus = node[:cpu]
            end

            conf.vm.hostname = node[:hostname]
            conf.vm.network "private_network", ip: node[:ip]
            conf.vm.network "forwarded_port", guest: node[:guest], host: node[:host]

            configure_dns conf

            # Forwarding IPv4 and letting iptables see bridged traffic
            conf.vm.provision "forward-ipv4", type: "shell", :path => "network/ipv4_forward.sh"

            conf.ssh.private_key_path = ["~/.vagrant.d/insecure_private_key", ssh_key]
            conf.ssh.insert_key = false
            conf.vm.provision "file", source: ssh_key + ".pub", destination: "~/.ssh/authorized_keys"

            if index == nodes.size - 1
                ansible_playbook.each do |play|
                    conf.vm.provision :ansible do |ansible|
                        ansible.inventory_path = ansible_inventory_path
                        ansible.verbose = "v"
                        ansible.limit = "nodes"
                        ansible.playbook = play[:path]
                    end
                end
            end
        end
    end
end
Let's go over the parts of this Vagrantfile:
Global variables:
# Every Vagrant development environment requires a box. You can search for
# boxes at https://vagrantcloud.com/search.
box = "ubuntu/bionic64"
ansible_inventory_path = "inventory/hosts"
ssh_key = "~/.ssh/id_rsa"
📋 In this part, the box variable contains the virtual machine image for Ubuntu
18.04 LTS, which will server as the operating system for all VMs in our cluster.
The ansible_inventory_path varibale points to the file where Ansible will store
its inventory on the host machine and ssh_key holds the path of private key required
to access the VMs.
Ansible playbooks references:
ansible_playbook = [
    { :name => "Containerd", :path => "ansible/playbook-1.yml" },
    { :name => "Kubernetes", :path => "ansible/playbook-2.yml" }
]
Virtual machines or nodes details:
nodes   =   [
    { :hostname => "master-node", :ip => "192.168.56.2", :group => "master", :memory => 2048, :cpu => 2, :guest => 22, :host => "27101" },
    { :hostname => "worker-node01", :ip => "192.168.56.3", :group => "worker", :memory => 2048, :cpu => 1, :guest => 22, :host => "27102" },
    { :hostname => "worker-node02", :ip => "192.168.56.4", :group => "worker", :memory => 2048, :cpu => 1, :guest => 22, :host => "27103" }
]
📋 This is basically an array of objects, with each object representing a node or virtual machine in our cluster. Each object contains information such as the node's hostname, ip address, group, memory size, cpu core, guest and host port number.
DNS configuration:
def configure_dns(node)
    # Set up /etc/hosts
    node.vm.provision "setup-hosts", :type => "shell", :path => "network/hosts.sh" do |s|
      s.args = ["enp0s8", node.vm.hostname]
    end
    # Set up DNS resolution
    node.vm.provision "setup-dns", type: "shell", :path => "network/dns.sh"
end
📋 The function in this code snippet is responsible for executing the hosts.sh and dns.sh scripts, which will result in enhancing DNS resolution and configuring the etc/hosts file on all nodes.
Generate Ansible inventory:
Vagrant.configure("2") do |config|

    if File.dirname(ansible_inventory_path) != "."
        Dir.mkdir(File.dirname(ansible_inventory_path)) unless Dir.exist?(File.dirname(ansible_inventory_path))
    end

    File.open(ansible_inventory_path, 'w') do |f|
        f.write "\n"
        f.write "[nodes]\n"
        nodes.each do |node|
            f.write "#{node[:hostname]} ansible_host=#{node[:ip]} \n"
        end

        nodes.each do |node|
            if node[:group] == "master"
                f.write "\n"
                f.write "[master]\n"
                f.write "#{node[:hostname]} ansible_host=#{node[:ip]} \n"
            else
                f.write "[worker]\n"
                f.write "#{node[:hostname]} ansible_host=#{node[:ip]} \n"
            end
        end
    end

end
📋 Remember the ansible_inventory_path variable? It points to a hosts file that Vagrant will generate to save the details of our nodes, sorted by thier respective groups. This allows Ansible to systematically connect to our VMs for executing general or specific Ansible tasks.
Set Box Image and Loop through nodes:
# Virtual Machine Image
config.vm.box = box
# Loop through all nodes to provision vms
nodes.each_with_index do |node, index|
Nodes Memory and CPU:
conf.vm.provider "virtualbox" do |vb|
    vb.name = node[:hostname]
    vb.memory = node[:memory]
    vb.cpus = node[:cpu]
end
📋 There, Vagrant is told to provision virtual machines with the memory and cpu information given in the nodes array.
Set VM hostname and network configuration:
conf.vm.hostname = node[:hostname]
conf.vm.network "private_network", ip: node[:ip]
conf.vm.network "forwarded_port", guest: node[:guest], host: node[:host]

configure_dns conf

# Forwarding IPv4 and letting iptables see bridged traffic
conf.vm.provision "forward-ipv4", type: "shell", :path => "network/ipv4_forward.sh"
📋 We configure each virtual machine by defining a unique hostname and assigning a private IPv4 address. Then we set up port forwarding to facilitate data transmission from the Ubuntu server (host machine) to the VMs (guest machines). Additionally, we call the configure_dns function and execute the script within the ipv4_forward.sh file.
Insert custom ssh public key to the VMs:
conf.ssh.private_key_path = ["~/.vagrant.d/insecure_private_key", ssh_key]
conf.ssh.insert_key = false
conf.vm.provision "file", source: ssh_key + ".pub", destination: "~/.ssh/authorized_keys"
Nodes configuration with Ansible:
if index == nodes.size - 1
    ansible_playbook.each do |play|
        conf.vm.provision :ansible do |ansible|
            ansible.inventory_path = ansible_inventory_path
            ansible.verbose = "v"
            ansible.limit = "nodes"
            ansible.playbook = play[:path]
        end
    end
end
📋 After all the virtual machines are operational, Vagrant will initiate Ansible to execute the tasks specified in playbook-1.yml and playbook-2.yml on each VM.
Step 2
In this second step, we will generate and set up an SSH key pair on our Ubuntu server. Subsequently, Vagrant will automatically distribute the public key to every VM during the provisioning process. This will enable secure remote server access, allowing us to authenticate and communicate with the VMs without the need of passwords.
Well let's create the key pair with the command below in your terminal:
ssh-keygen -t rsa -b 4096 -C "youremailaddress"This command will generate an RSA key pair with a key length of 4096 bits and associate your email address as a comment to the key. After entering the command you see the following prompt:
Generating public/private rsa key pair.
Enter file in which to save the key (/home/your_username/.ssh/id_rsa):
Press Enter to save the file in the suggested directory. Next the prompt will continue with:
Enter passphrase (empty for no passphrase):
Enter same passphrase again:
Here, you may just press Enter or provide a passphrase that you should remember
Finally, the output will display the information below:
Your identification has been saved in /home/your_username/.ssh/id_rsa
Your public key has been saved in /home/your_username/.ssh/id_rsa.pub
The key fingerprint is:
SHA256:5wDWEi1RsYqMHRDvlYheHACqoKQKgNfpDoD+0NoK4yU youremailaddress
The key's randomart image is:
+---[RSA 4096]----+
|..+o. o+o.       |
|+  * +.+..       |
|B.o O *.o        |
|O+.B = +         |
|=o+.* . S .      |
|o =o     +       |
|+E +.     .      |
|o.+              |
| o               |
+----[SHA256]-----+
📋 The key pair generated consists of a private key id_rsa and a public key id_rsa.pub, and as mentioined earlier, the private key will be kept secure on the host machine while the public key will be distributed across guest machines by Vagrant.
At this stage of the lab, our working directory tree should have the following structure:
.
├── ansible
│   ├── playbook-1.yml
│   └── playbook-2.yml
├── network
│   ├── dns.sh
│   ├── hosts.sh
│   └── ipv4_forward.sh
└── Vagrantfile

3 directories, 6 files
Now, in the current working directory k8s-lab , execute vagrant up to have Vagrant initiate the startup process for our three virtual machines. This will load the specified operating system onto each VM, configure the networking settings, and harmoniously provision Containerd, kubeadm, kubelet, and kubectl using Ansible.
vagrant upThis provisioning process will take long, so you might want to go fix yourself a drink ☕️ in the meantime.
To gain a better understanding of the process and observe its duration, I recommend watching the video provided here. Once you have successfully provisioned all the nodes with the required software, return to this page.
Next in this second step, we will inspect the provisioned virtual machines to verify their status and check if the desired software has been successfully installed. By doing so, we can ensure that provisioning process was effective and carry on to creating our Kubernetes cluster.
-
To verify the VM status run
vagrant statusin the working directory:
-
To check that Containerd, kubeadm, kubelet and kubectl are installed on each virtual machine, you have a two options. You can either use the Vagrant SSH command or manually SSH into each VM to execute
containerd -v,kubelet --version,kubeadm versionandkubectl. -
An even more efficient option is to utilize Ansible. With single line of command, Ansible can access all three nodes simultaneously and verify if the required software are installed. Run the following command in the working directory:
ansible -i inventory/hosts -u vagrant nodes -m shell -a "containerd -v && kubelet --version && kubeadm version"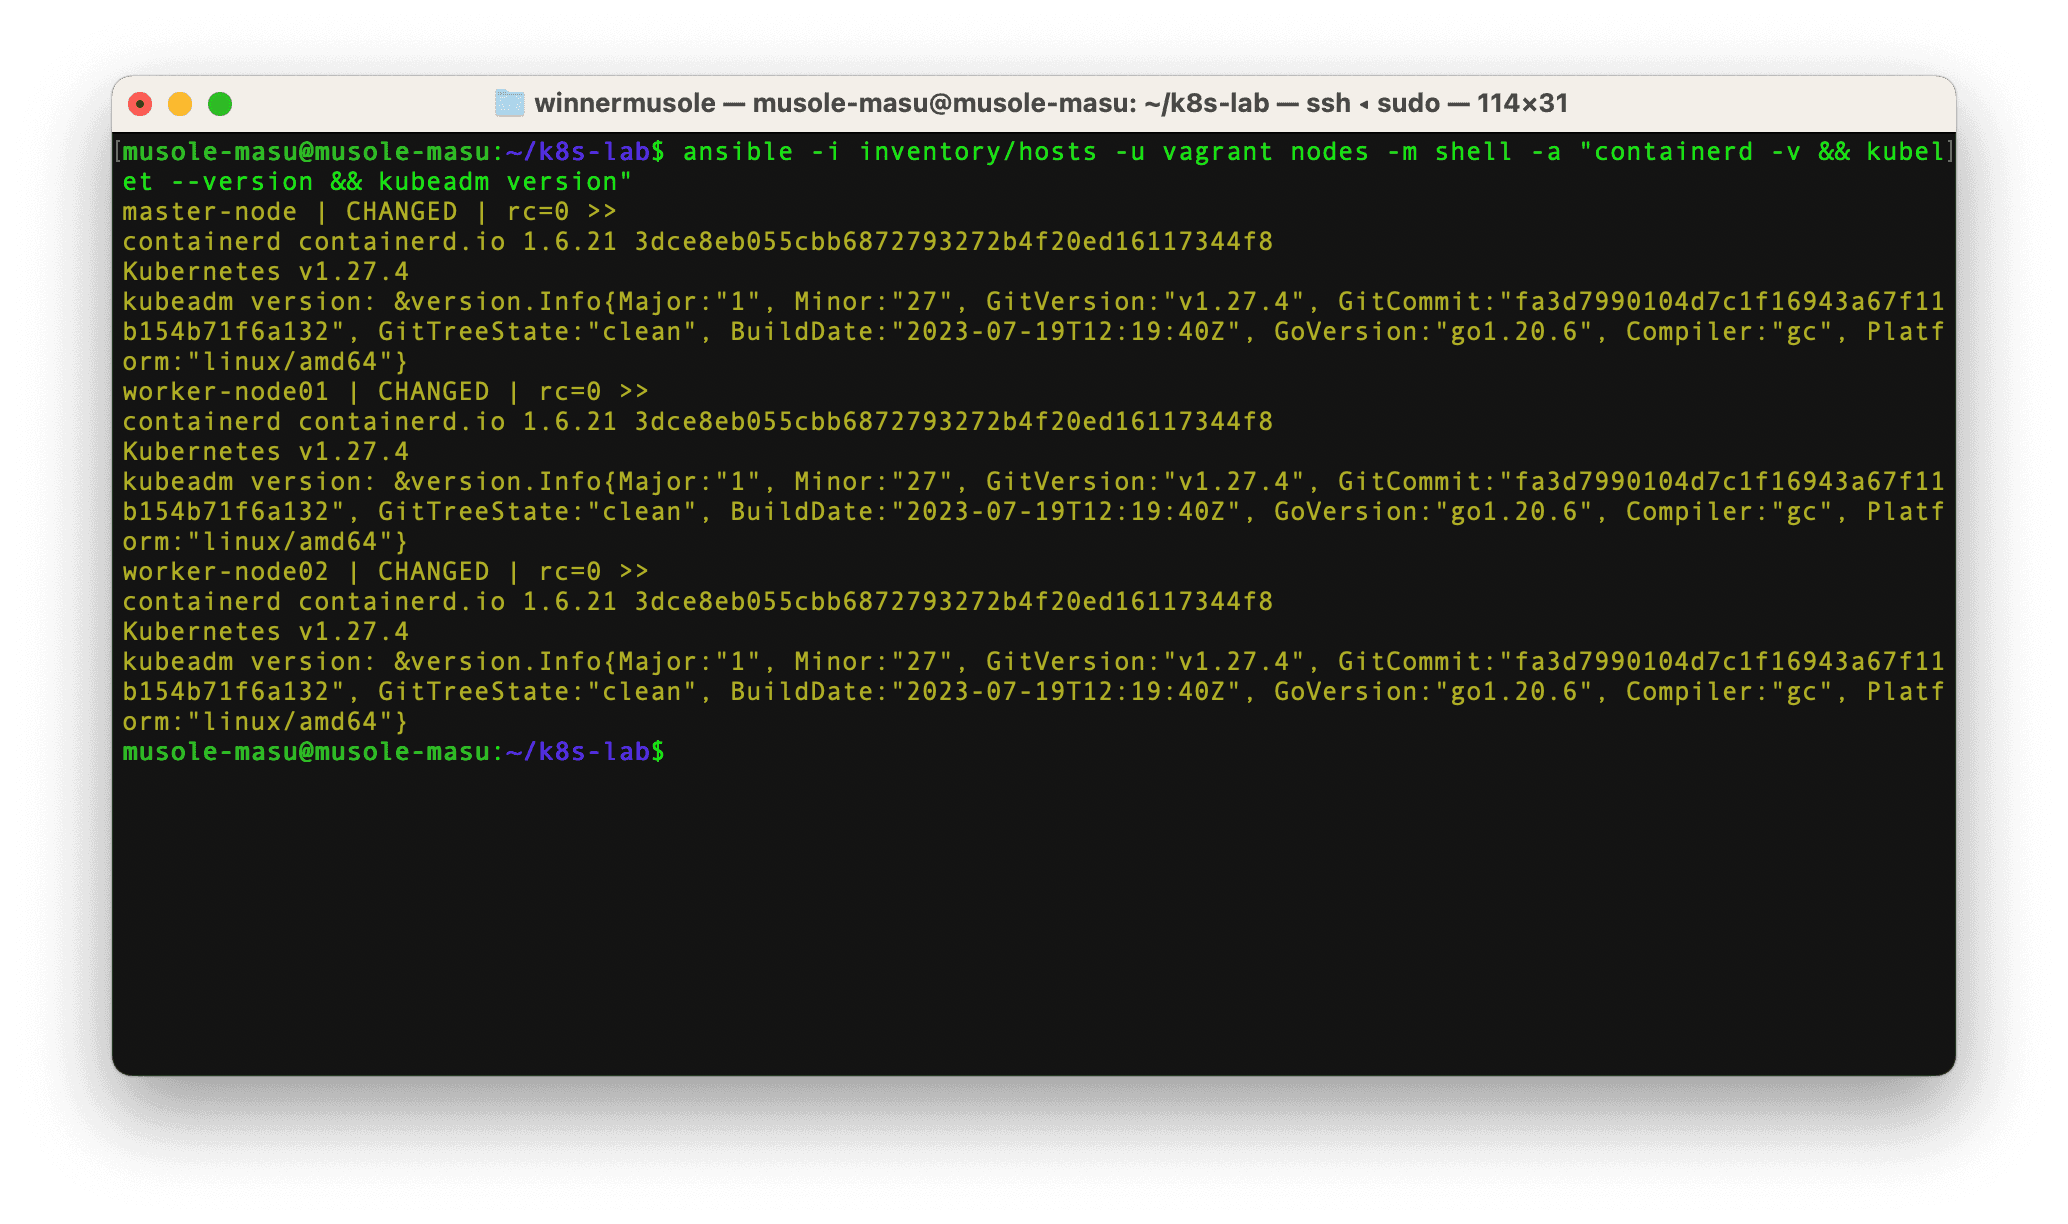
📋 During the provisioning process, Vagrant created an inventory file at inventory/hosts
with the target servers (virtual machines). The command above tells Ansible to connect
to a group of virtual machines called nodes to ensure that Containerd, kubeadme,
kubelet and kubectl are installed.
Kubernetes cluster
Across all virtual machines, we have installed the essential tools required to create our Kubernetes cluster. Containerd has been set up to handle the management of pods. The presence of kubectl on all VMs provides us with an easy way to interact with the Kubernetes cluster when it will be created. With kubelet in place, the master node can effectively communicate with the worker nodes, ensuring optimal coordination.
A key component, kubeadm, is also present on each VM, which will now play the main role in creating our Kubernetes cluster. Let's first begin by Initializing the master node also called control-plane node by running the Ansible command below in the working directory:
ansible -i inventory/hosts -u vagrant master -m shell -a "sudo kubeadm init --pod-network-cidr=10.244.0.0/16 --apiserver-advertise-address=192.168.56.2"📋 Here Ansible connects to the master node to run kubeadm init which initiliazes a new Kubernetes control-plane instance, this command takes two arguments:
--pod-network-cidr=10.244.0.0/16a pod network add-on cidr block to facilitate the communication between pods across nodes--apiserver-advertise-address=192.168.56.2with this argument, Kubernetes advertises the IPv4 address of the master node to allow other nodes to discover and connect it.
After executing the above command, the Kubernetes master node (also known as the control-plane node) should have been successfully initialized. To start using it you need to get into your master node:
vagrant ssh master-nodeAnd run the following on the terminal:
mkdir -p $HOME/.kube
sudo cp -i /etc/kubernetes/admin.conf $HOME/.kube/config
sudo chown $(id -u):$(id -g) $HOME/.kube/config
Aslo, we should deploy a Container Network Interface (CNI) based Pod network add-on
so that pods within our cluster can easily communicate with each other. Among the
addons available, flannel
is the best choice because it is easy to install and aligns with the pod network
CIDR block previously defined through the kubeadm init command.
Let's add the flannel add-on in our cluster with this Ansible command:
sudo kubectl apply -f https://github.com/flannel-io/flannel/releases/latest/download/kube-flannel.yml📌 It's worth noting that our focus has been primarily on tasks within the master node during this section of the lab. Our Kubernetes Cluster has been created, complete with pod networking configuration. However, a pending step involves having other virtual machines join the cluster as worker nodes. So let's deal with that in the next lines.